Pages

Monday, December 30, 2013

Diy Vest

So I Saw a Picture on Pinterest and Really Wanted to do it so i did it a couple of minutes ago :) And here it is.


Supplies:
Very Large T-Shirt
Scissors

So all you do is cut off the sleeves the sides and the collar and Voila :)
The Shirt I Got for $1 at the DI


Cut Off Sleeves

Cut Off Sides

Cut Off Sides

Front View

Back View and Sorry it is Upside Down :)

Side View :)
 Try it! It only took me 5 Min :) Have fun!


Wednesday, December 25, 2013

Washi Tape Charger

Sorry guys it has been over a Month since I have done a post! Been Way busy with my new job. But now I am back! This is just a simple project involving Washi Tape, Scissors, and my Charger.... Pretty easy but fun project when you are feeling a little creative.


Fun last min Christmas Craft :)

Saturday, November 23, 2013

Happy 50th Anniversary Doctor Who!!


HEY!

Happy 50th Anniversary to Doctor Who!!!

Ive only done one Doctor who  Craft however a favorite blog is having a Doctor Who Week Here Is The Link. So you should check out mine then go to her website it is fun and Full Of Doctor Who Crafts!! Enjoy the day!

Wednesday, November 20, 2013

DIY Foam Board Art

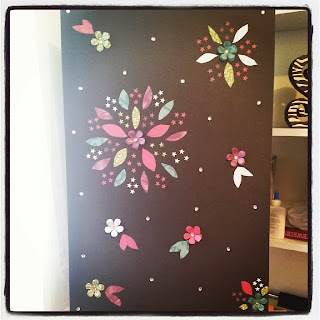
So I saw a picture on Instagram of  foam board art with scrapbook paper. So I too the idea and ran with it!


So This project only cost me about $2.50.
Supplies
- Scrapbook Paper $1 ( At Dollar Tree)
- Foam Board
- White Glue
- Jewels $1.50
- Punches ( Flower and Star)
- Scissors

I cut all of the Leaves out by hand, the Flowers were punched out, and so were the stars.
I just pieced it all out. I Winged all of and did whatever I wanted. Finished all of the paper and thought that it needed something else. So I went to the craft store and bought some jewels. Here is the finished product!

I had so much fun with this project! Hope you find some inspiration from this piece!

Tuesday, November 19, 2013

Beauty Tip!

So I am 20 and never really was into Make up or doing my hair fancy until I actually started seriously dating. And have more Recently watching RachhLoves Channel on YouTube for some tips. Just wanted to share some stuff that have been some of my Favorites!

So First i wanted to show you what i have been loving to do with my hair! Twisting my bangs up and the next two pictures are a couple of examples of how i use it.
Twisting up one side and curling the other.

Twisting it up to make a ponytail more interesting.
 Next are some products that i have been using when i actually use makeup!

 
ELF Eyelid Primer! Had my Make Up On for 6 Hrs when I took the Picture and the best part is that this product is only $1 at Target!


This Product is Maybelline age rewind eraser! LOVE this stuff! Rachh Swears by this! This one is on the more expensive side its $7.95 at Walmart but it is totally worth it! I have used mine so much I need to go buy another bottle!


Next is the L'Oreal Carbon Black Voluminous Mascara. Love this stuff!! But i do recommend that if you plan on crying then get the Waterproof cause this stuff runs if you cry! Love this stuff because it makes my eyelashes become and like the name Voluminous :) This Stuff Retails around $6.00 at Target. This is also one Rachh from Rachhloves recommended.


Here is the Link to the RachhLoves Channel In case you would like to watch her tutorials! Click Here and Subscribe


Thank you for Reading! Come Back Later and Will have a Fun Craft Project!!


Wednesday, November 13, 2013

Leg Warmers

So todays project I made leg warmers. I Bought a Sweater From the DI For $3 ( A Thrift Store for those out of UT, Idaho, and California)The Rest I Already Had: A Sewing Machine, and Thread. And it only took me 15 min to make!


I cut the sleeves off of the sweater  and Sewed around the Cut part a Viola!


Photo: Another Project! I think this is the first time I've used the sewing machine without it jamming! #Crafty #Sewing #DIY


Love how they turned out! The only thing that i may fix is putting the elastic on the bottom so they stay. On the next pair i make i would like to put lace on the top or something funky! Enjoy Making your own! May as well be styling thru the winter :)

Tuesday, November 12, 2013

Dreaming

Simple Project so just one pic but its a fun craft and a way to show just who you really are. I decided that i was going to make a dream board. All i did was print off the pictures from my old job (Shhh dont tell),used some scrap paper I already had, Glue, a poster board (for 30 cents at walmart), last but not least some sharpies. Here is how it turned out.


Sorry Bad pic but you get the idea


Follow Your Dreams!

Wednesday, October 30, 2013

Laptop Cover

So i found this project from this website. (Click Here)
My Laptop Is a Little Banged Up From Taking it back and forth from work, Moving Etc. SO I felt it needed a little Make Over


I Used Sharpies And Painters Tape

Contact Paper an Scissors

Another Example Of Why My Poor Laptop Needs A Makeover


Now to the Fun Part...
I Traced My Laptop And Cut Out the contact paper

Printed This Off and Traced it on the Contact Paper

Used the Sharpies to trace it

Found This Pic Of Adipose Off of Google and traced it onto paper

.. Then Traced it on to the contact paper

Then Found a pic of a dalek ( Yes I am a Geek)

and traced it on here..


Finished Product

Used My AAA card to make it smooth out the paper on my Laptop

FINISHED! Love it :)

Have Fun With It and Like the post to tell me if you like it :) Send me pics of what yours turn out like i would love to see!

Tuesday, October 29, 2013

CRAZZY

Sorry my life has been very crazy the last 3 months so i have not posted anything. But i will very soon :)

-Clara

Saturday, July 13, 2013

Dollar Store Craft


**Update on The Dollar Store Craft. To Make The Stand Used Super Glue. MISTAKE! It fell Apart :p.
So Recently I Used E6000 and it works wonderfully. The Only Problem is the smell my mom cant stand it and will not let me have it in the bathroom. But Use that instead of the superglue. :)**


I saw this project on Pinterest and fell in love with it! So I went to Dollar Tree and bought the platters and the candle sticks. This Project only cost $5 and only took 10 minutes! All u need is platters, candlesticks, and superglue. This is what mine turned out like and I LOVE IT! Very simple! and this is not the only way you can do it too there are many Variations! Have Fun!


Monday, June 3, 2013

(Most Recent Project) Pizza Pie Picture Display

So recently on Pinterest I saw where instead of paying big bucks for the metal sheets to hang pictures on you can just take a cheap pan. So i decided to go a different way with it. I found a $.97 Pizza pan from Walmart and decided to use that. Then I was at Joanns and saw some cute buttons on a really good sale so I decided to make those into magnets. Then i took some ribbon and braided it together to hang it up with its still a work in progress once I get pictures to hang on it. Overall I think i spent about $7 on the whole thing very reasonable! Here is the "Finished" product and some of the picture along the way. (tip if u live in a hot place then i suggest super glue)


97 cent pizza pan from Walmart i have also seen it at Dollar Tree

I braided the ribbon to hang it.

Finished Product

Made the magnets out of butons

Hot Glued pop tabs to the back to hang it up.